 Have you ever opened a newly downloaded program or tool and found yourself at a loss on how to start using it? What are the most useful options to start with?
Well, you’re not alone. That is why User Guides were invented, right?
At ATL, we work with multiple tools for translation, translation integrations and solutions that help to make the localization process as smooth and efficient for our clients as possible. We have experience in using many of them, and we can easily adapt and work with new ones.
The thing is, when you are in a rush, deadlines are approaching, and you have 5 projects in line, you are not always willing to read a 40 pages long manual just to get things moving.
The same thing happened to me when I first opened MadCap Flare to start working on a project. It was a rocky road of trial and error, online research, and manual reading.
To spare you the time needed for all of the above, here is a quick start guide to translation with MadCap Flare. It contains all the essential information on how to operate the tool and get your projects started.
Before we go into detail on how to operate in Lingo, first we should explain what it is.
Lingo is a translation tool for projects created with MadCAP Flare, and is one of the products in the MadCap software family. Files for translation are sent in bundles with the file extension .liprjzip.
The tool looks similar to every other CAT tool, as it has a bilingual table with source and target, a Translation Memory to store your translations, and a Termbase to keep the terminology consistent.
But at its core, it is a tool for translating technical documentation, because it is linked with the tools used to create such content. It also lets you import multiple file types into one project, including graphic files, and send them as a bundle for translation, which reduces exchanging files back and forth.
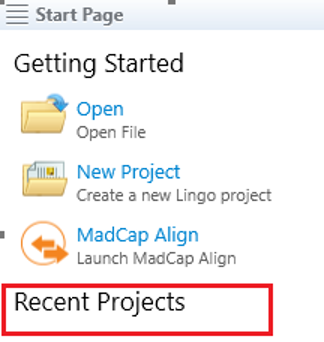
To open this package, simply double-click the file, and the package will automatically open in MadCAP Lingo. You can also open the package by going to MadCAP Lingo and using the option Open -> (path to the file). The project will show up on the Recent Projects list on the Start Page.
If the project does not open automatically when you double click, you can open it by clicking once on the name of the project in the Recent Projects list.
Once the project is open, you will see the list of the files on the left, the editor in the middle, and the spellchecker box on the right.
You can move the windows around, lock them in place, or turn them off. They can also float around. If you turn a window off and would like to have it back, go to the View tab at the top and choose any windows you feel are necessary from the list.
To lock them in place, go to the side panel and hover your mouse over the name of the window and click the pin. To unlock it, click the pin again – the window will be floating.
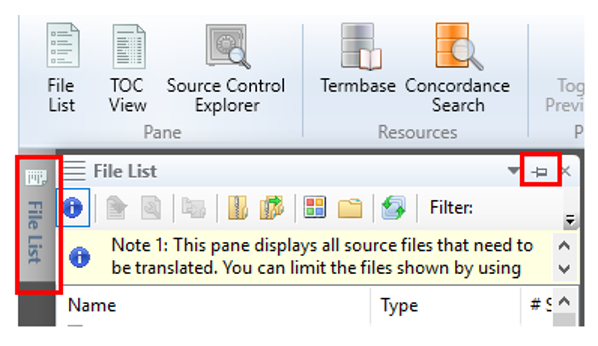
On the File list, you will see all the files to translate with extensions (file types). You can either have the list of files in a List format, or in a TOC (Table of Contents) format. In TOC format however, you will not see graphic files.
When checking the files before starting the project, be sure to check if the graphic files are prepared for localization. Graphic files can be prepared for localization in MadCap Capture (a side product of MadCap).
Related content: 6 Tips on Preparing Your Content for Translation
Alternatively, the translation provider can have the graphics translated in a separate file, so that graphic designers can prepare localized versions of those and place them in Lingo project afterwards.
To prepare the translation bundle for linguists, click on a file in the File list and press Ctrl+A to select all the files. Certain selected files can be chosen to be included in the bundle by clicking them one by one while holding down the Shift button on the keyboard. Once all the appropriate files are selected, go to Home -> Create a Bundle.

To create a bundle for a CAT tool, choose the XLIFF Files Bundle. To create a bundle for Lingo users, choose the other option. In multilingual projects, it is also important to choose the target language for the translation.
The default option is to export all languages in one bundle, but you can create separate bundles for each language. The files will have a language code added to the name; therefore, it will be easy to determine which files are for which language. Also, check the boxes to include Translation Memory and Termbase if you would like to share that with the translation team.

You can also check if there is a TM (Translation Memory) and TB (Termbase) available, prior to creating the bundle, in the Resources tab on the top of the program window. There is an option to skip graphic files in the export if they are not to be translated, by unchecking them in the Project Files Filters -> File Types.
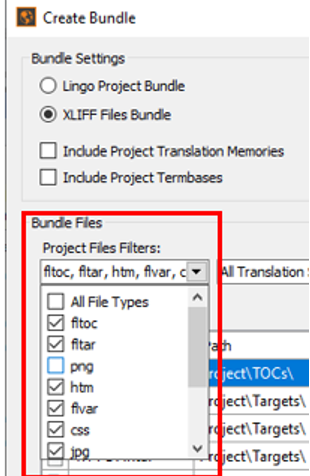
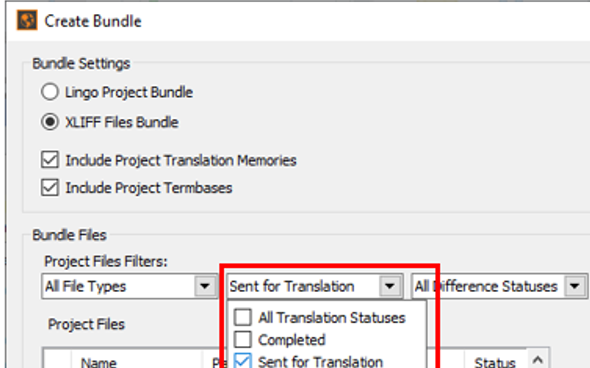
There is no need to change other filters unless the package sent is an update. If it is an update, you can choose to export the files for translation only by filtering translation statuses per Sent for Translation. Files in which no updates were introduced will have the status Completed.
You can choose the files to add one by one on the Project Files list on the left of the dialog window, or select all filtered files by using Ctrl+A and selecting the blue arrow on the right of the files box.
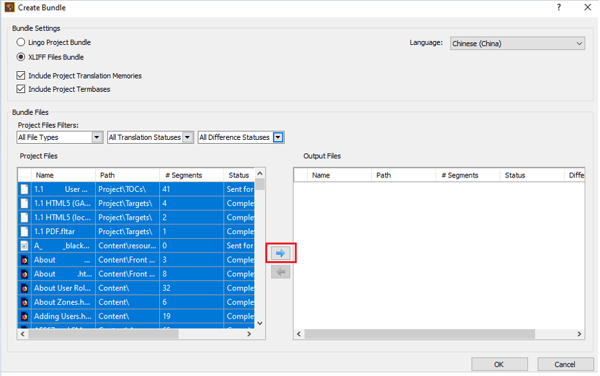
Then press OK and the files will automatically be exported. You cannot provide the export path though. The files will be exported to the same directory as the opened Lingo package into the subfolder Exporting. There, you will see the zip file, with the same name as the base project bundle, but a version of the exported files will be added to the bundle name.

All the files in the export folder are files for translation. There are no additional files in the zip folders, like maps, or structure files.
In a lingo project, you can see only one language at the time. To check the files for other target languages, you will have to change the language of the whole project. In order to do that, go to File -> Project Properties -> Current Target Language. Choose the target language you would like to view and press OK.
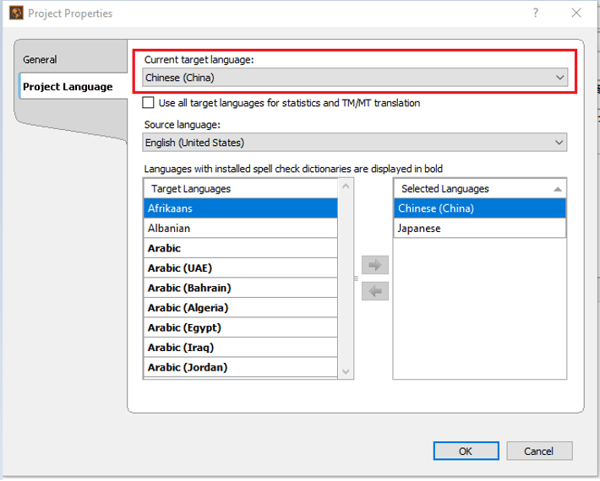
Any additional languages can be added from this window as well. To add an additional language to the project, select the correct language from the Target Languages list and click the correct arrow.
If there is a glossary or a termbase available, you can export those directly from the program. To do this, you must go to Resources -> Export to TMX. The same goes for Termbase (Resources -> Export Termbase). You can also use MT (e.g. Google Translate plugin) in Lingo if needed.

Now that all the content is translated and the final files are ready to be imported back to Lingo, the task is relatively easy. First of all, the files do not have to be put back into folders/subfolders like the Exporting folder.
Create a folder and put all the translated .xliff files received from translation into this folder. In order to import the files back into Lingo, simply zip all the translated files into a bundle (a zip folder). Unzipped files/single files will not be imported into Lingo. Even to import just one file back into Lingo, this file has to be zipped into a Bundle.
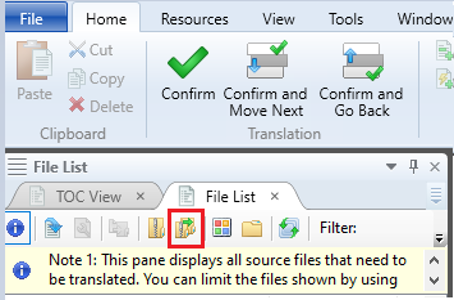
Once all the translated files are zipped into one bundle, go to Lingo and choose the correct language in File -> Project Properties -> Current Target Language. Then use the Merge Bundle button, which can be found either in the Home tab or in the File List.
• Home view

• File list view
The pop-up window provides the path to the saved Translated Files bundle zip that was just created. Double click, wait for all the files to be loaded, and check to make sure there were no errors in the loading screen.
If there were no errors, all the translated files are in the project now. You can now proceed to performing additional checks directly in MadCap Lingo and making sure that all content is translated.
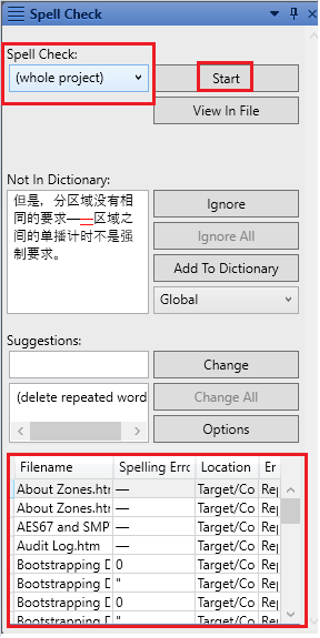
To perform additional spellchecks in Lingo, go to the Spell Check window and click Start. If you do not have the Spell Check window activated, you can turn it on by going to Tools -> Spell Check Window. Once you click start, Lingo will start checking the files.
The default option is to check the whole project, but you can also choose to check only files in one folder (from TOC view) or only the file that is currently open. The list of possible errors shows on the bottom of the window.
Now that the translation is imported back into Lingo, it’s time to check if all the content is correctly translated and imported. This can be done by checking file statuses in the File List view in Lingo.
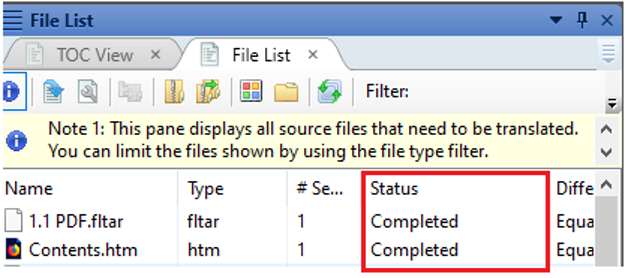
To do so, you have to enlarge the file list window, (by default, this information is hidden), by clicking on the right side of the box and dragging it to the right. Then, once you can see the columns appearing, you have to scroll down the Name column.
On the right, next to the # Segments column, you will see Status. If all the statuses are Completed then the files are fully translated and can be delivered back to the Flare project.
If the status of the file is different than Completed, then open the file and make sure all segments are confirmed and contain translation. You can also change the status of the file manually, as shown below:

Open the drop-down list and choose the correct status from the list. Then click Save All button or click Ctlr+Shift+S.
The graphic files have to be prepared in Lingo with the use of MadCap Capture.
If there is no option to use MadCap Capture, you can download the graphics, perform the DTP (Desktop Publishing) outside of the tool, and then replace the source graphics with the localized ones directly in Lingo.
You can also send the extracted source text from the graphics to your translation provider, and then have graphic designers prepare the localized versions of the graphics, which then can be placed directly in Lingo.
To replace source graphics with the localized ones, click and choose all the graphic files you want to replace, and use the Batch Replace Images button in the Home tab in Lingo.

In the pop-up window you will see the list of all the graphics you have chosen (by clicking on them on the File List, holding the Ctrl key) to be replaced with localized ones.
Then click the three dots under the target language column separately for each file, and provide the path to the localized graphic you have saved on your PC. It is advisable to name them the same as the source graphic, adding the target language code to that. Meaning that the name graphic.jpg from source will become graphic_pl.jpg.
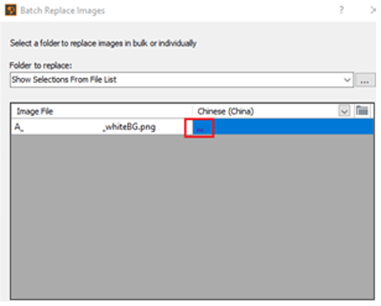
On the bottom left corner, there is also a preview of the source graphic available. Once you have chosen all the graphics, press OK.

All the translation projects you opened in MadCap Lingo are available to open again under the Recent Projects on the Start Page. The most recent is on top.
.png?width=600&name=what%20to%20remember%20about%20translation%20with%20MadCap%20Flare%20(1).png)
Even though Lingo is a translation tool, it does not work exactly like other CAT tools used for translation. It has translation memory and termbases just like a regular CAT tool, there are in-program checks, and the content is divided into segments containing one or a couple of sentences.
There is also a source-target view which looks like a regular CAT tool, but at its core, Lingo is a tool to translate documentation. It works from the TOC, or file view, and you can process graphics directly in Lingo.
It is good to know how to export the content to be translated outside Lingo as well, as not all translators have or work in Lingo. As you may have seen above, that is not a problem, since the files can be exported to work in any available translation tool (that use .xliff file type) with just a few clicks.
It may look complicated at first, but hopefully with these basic tips, you can quickly start working in the tool and sending out content to be translated. Good luck!
Recommended articles:
3 Document Authoring Tool Integrations With Translation Systems: An Honest Review
+1 857 777 5741 ext. 203 (business inquiries)
+1 857 777 5741 ext. 205 (career inquiries)
Trylinskiego 16, 10-683
Olsztyn, Poland
Copyright ATL 2025. All Rights Reserved.